I found some gold animal print jacquard fabric a while back and instantly fell in love. I have had it for a while and waited until I was settled on just what type of skirt to make with it. I saw a gold fabric similar to this in a J.Crew skirt a few years ago and had been on the hunt for something like this.
In the end, I decided to create a mix between these skirts:

modcloth

anthropologie

anthropologie
Here is what I came up with


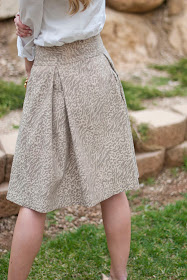


It's hard to tell in the pictures, but the fabric has a little hint of shimmer to it. I'm not a fan of shiny fabrics, I think a lot of times they can end up looking cheep, but this fabric is thick and has just the right amount of golden glow to it.
The instructions aren't too complicated. Just lots of pleating.
If you don't know how to sew, or know the basics but are interested in learning more, Merrick and I have created The Modern Girl's Guide to Sewing, online sewing courses that teach you everything you need to know about clothing construction. You can take our Beginner Course or our Intermediate Course, and learn how to follow tutorials like this one! Make sure to check out moderngirlsewing.com!
Click through below for the tutorial...
materials:
- 1 1/2 - 2 yards of fabric
- coordinating thread
- zipper (I used an invisible zipper)
Step 1:

Cut out your pieces. I wanted my waistband to be 2" thick, so with the seam allowances, my pieces were 3" thick. Measure around your waist, divide that by 2 to get your front and back pieces, however, add an extra inch to the length of your back waistband. You will be cutting this in half and will need the extra s.a. for your zipper. Don't forget to add on 1/2" on each side for the s.a. as well. I always like to make the bottom of my waistband 1" longer than the top. That way it fits me a little more snug at the top of my waist. I doubled up on the waistband because I like it to be a little thicker and more sturdy. You will need to do a little math before you cut out your skirt pieces. I wanted a lot of thick knife pleats, so I ended up using fabric for the front of my skirt that measured 45" wide and 24" long (I knew this would be plenty long and I wanted a 2" hem). When all the pleats were created, the front skirt portion ended up being 16" wide
My back skirt sections measured 17 1/2" by 24" each. I just did an inverted pleat on either side of the zipper. Basically I just used what fabric I had left over.
Step 2:


Create the pleats for the front of the skirt. Make sure that the folds of the left 2 pleats and the folds of the right 2 pleats all point to the center of the front of the skirt. I used pins in coordinating colors to remind me which pins to match up to create the knife pleats. The pins for my knife pleats were about 7" apart. You don't have to follow my measurements exactly, just go with what looks good, but make sure they are symmetrical. Leave at least 1/2" extra on each side for s.a. Once you have created the pleats with your pins, serge or sew the pleats in place 1/4" away from the edge.
Step 3:


Create the inverted pleats on each back skirt section. Again, you can eyeball this until it looks good. Keep in mind that you need at least 1/2" on either side of each back skirt section to allow for the seam allowance and zipper seam allowance.
Once you have created the pleats with your pins, serge or sew the pleats in place 1/4" away from the edge.
Step 4:


Step 5:


Sew 1/2" from the top along the width of your front and back waistbands. Cut your back waistband in half and attach to the front waistband so it creates one long waistband. Attach it to the top of your skirt, making sure to match up your side seams. For more detailed instructions on attaching the waistband, follow the waistband instructions on my pinwheel skirt tutorial. 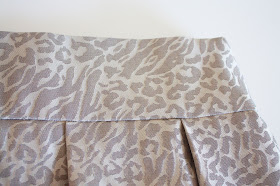


Step 6:


Take a deep breath..... and insert your zipper. I stepped even further out of my comfort zone this time and used an invisible zipper. I actually bought the little plastic invisible zipper foot (they are about $2 and are usually located right above the zippers). It was tricky, so watch this tutorial a few times before taking the plunge. The instructions printed on the invisible zipper package might as well have been written in Hebrew. I need to physically see the zipper being put in to understand it, so written out instructions don't work for me. I swear, I have watched this tutorial at least 20 times. It is simple and clear and works for me so I'm going to stick with it.
Step 7:
Take a break from ripping your hair out and pat yourself on the back because you inserted a zipper.Either that or get in the car and head back to Joanns for another zipper because you got so frustrated that you ripped your first zipper right in half. I'm not ashamed to admit that I have done this. It was a while ago and it was my first invisible zipper. It just felt really good to break that stupid zipper.
Step 8:
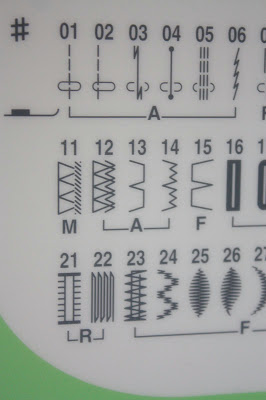


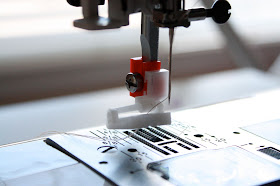
Hem your skirt. Since my fabric was thicker, I wanted a thicker hem. My hem was 2" and I used a blind stitch for the hem. If you haven't tried hemming with this stitch I highly recommend it. It takes a little practice but the hem is basically invisible and I love the look of it.
Stitch #13 is the blind hem stitch I used.
see? no stitch marks!
DONE!


Top: Banana Republic, Skirt: me, Jacket: Nordstrom, Shoes: Steve Madden, Bracelet: Juicy
Gosh, you are SO good! I love all the skirts you make!
ReplyDeleteamy day to day
The list of things I want to sew is piling up. Add it to the list. Very well done!
ReplyDeleteGoodness that skirt is adorable!
ReplyDeleteLinda, linda, linda...
ReplyDeleteParabéns.
It's totally beautiful! Nice job! I'm impressed by your venturing into the land of the invisible zipper!
ReplyDeleteThat is seriously the cutest skirt Leanne! I love the fabric. You are so talented! You are also a great model!
ReplyDeleteOkay, that's awesome! You are so skilled Leanne. I love the choice of fabric and how well your shoes match :)
ReplyDeleteGorgeous! <3
ReplyDeleteGORGEOUS! I love it. You are so skilled. I am actually taking that BYU sewing class this summer (not sure what I'll learn but it'll be fun!) Thanks for inspiring me and putting up amazing tutorials!
ReplyDeleteCardigans and Cookie Dough
my favorite one so far. love.
ReplyDeletefantastic work. Thanks for the tutorial
ReplyDeleteOh Leanne. Can I just have you sew me a whole new wardrobe??! LOVE this skirt, along with everything else you make!!!
ReplyDeleteFlawless! I SUPER love this! You need to come show me this invisible zipper thing.
ReplyDeleteThis skirt is adorable, I wish I could sew!!
ReplyDeleteI WISH I COULD SEW!
ReplyDeleteI love this skirt! I'm headed to the fabric store today , thank you for such a great tutorial!
ReplyDeleteI have been saving up to do something great with some fabric I got from my grandmother years ago....this skirt is PERFECT! Thanks!
ReplyDeleteLove it! I'm going to make myself one now! Would big pink polka dots be too much?
ReplyDeleteJust wondering about the waistband. You said make the top 1 inch longer than the bottom. Is that 1 inch on each side, or 1 inch total (1/2 inch each side). Just wanted to clarify. It's super cute, and I'm excited to try it. Was it lined too?
ReplyDeleteVicsta - I make the bottom of the waistband 1" longer than the top of the waistband. For example, my 2 waistband pieces (front and back) both measure 15" across the top and 16" across the bottom (1/2" each side). Also, no it wasn't lined. But it probably should have been. Hope that helps clarify!
ReplyDeleteLeanne, would you mind sharing the designer's name of the Nordstrom coat you are wearing? It is beautiful!!
ReplyDeleteleanne, great job on the skirt! i would love to try it out but i always have trouble with the waistbands. i get the front part on but then when i go to topstitch around to attach the back on there are always spots where the back didnt catch. do you have any tips on how to do this better? also, with the stitch in the ditch, will it catch the back?
ReplyDeleteI just bought a skirt from Banana Republic in a very similar fabric but different style. They have amazing sales at their outlet so it was under $20. I definitely want to try to make my own though! Thanks for the tutorial!
ReplyDeleteJust finished making this fabulous skirt! Thanks for the AMAZING tutorial!! I love it!!
ReplyDeleteEmail me a pic of it! I'd love to see it!
DeleteAnother beautiful skirt! I featured this today for my Pleated Skirt Round-up during Skirt Week at seven thirty three. I'm serious, I probably could have done Skirt week with just your creations! You are amazing. :)
ReplyDeleteThanks so much for the features Kim!
DeleteI JUST finished making this skirt. Thank you for the tutorial! I love how mine turned out. My fabric was thinner, so I lined the whole skirt (I have issues with things being see-through) and included some lace at the bottom in between the layers. If my camera weren't on the fritz, I'd take a picture. I'm just so excited to have a new skirt in time for Easter (along with my girls).
ReplyDeleteThanks again!!!
Congrats Natalie! When your camera is back up and running I would love a picture of it!
DeleteHello I absolutely love this skirt. I want to make it for a graduation outfit and I was curious where the fabric was from?
ReplyDeleteHi! I just found your blog and LOVE all the things on it! I want to make this skirt and was wondering what kind of fabric you used? More specifically the weight? I'm a noob (newb..?) when it comes to sewing clothing so the more specific the better! I've only done project with home dec fabric and light cottons, not apparel fabrics. Thanks! :)
ReplyDeleteI was also wondering about the fabric weight - it looks heavy to me, so I went and bought a brocade but now I'm worried it will come out very bulky. And for those of us that are new to sewing without a pattern: did you cut your skirt pieces width-wise from your fabric?
ReplyDelete
ReplyDeleteالاول سيو افضل اشهار مواقع تعمل على تسويق المواقع وارشفتها باحدث وسائل السيو فهى تقوم بتهيئة المواقع لمحركات البحث لجلب الزوار والعملاء
ومن اقسام الاول سيو قسم الخدمات المنزليه مثل افضل شركة تنظيف شرق الرياض
وافضل شركة تنظيف شرق الرياض بالاضافة الى افضل شركة مكافحة حشرات شرق الرياض وتغطى خدماتها شرق وشمال الرياض فالاول افضل شركة مكافحة حشرات شرق الرياض تستخدم اقوى المبيدات الحشرية
واسعارها في متناول الجميع ومن الهام التاكد دائما من خلو منزلك من تسربات المياه حتى لا تتعرض لمشاكل مثل انهيار وتصدع المبانى الاول افضل شركة كشف تسربات المياه بشرق الرياض تستخدم اجهزه الكترونية اكشف التسرب بالذبذبات وتغطى كافة مناطق الرياض فهى افضل شركة كشف تسربات المياه شرق الرياض
اهم شركات نقل الاثاث بالرياض شركة اوائل الخليج
ReplyDeleteوتفتخرشركة اوائل الخليج
انها تقدم هذه الخدمات لاهل المملكه خدمات شركة نقل اثاث بالرياض
هل تريد ان يكون النقل بسعر رخيص حتي تستطيع الدفع بسهوله ؟
طلبك عندنا عزيزنا . . .ان شركة اوائل الخليج
تقوم بنقل الأثاث من باب بيتك القديم الي الجديد في اماناً تام و لا تقلق علي عفشك او اثاثك من الكسر لأننا نهتم به تماماً . . . و يمكنك ان تشاهد بنفسك هذا عزيزي العميل
أنت بنفسك ستكون موجوداً في عملية النقل . . . العمل سيتم تحت اشراف 4 مديرين للنقل و فريق عمل احترافي جداً و معتاد علي هذا العمل منذ الأزل و يستلموه اباً عن جداً لأن عملاً وراثي
ننقل العفش او الأثاث الي اي مكان في المملكه و في امان تام علي عفشك او اثاثك المنزلي
لا تقلق ابداً .
شركة تنظيف بالرياض
شركة تنظيف منازل بالرياض
شركة تنظيف فلل بالرياض
شركة تنظيف خزانات بالرياض
شركة مكافحه حشرات بالرياض
شركة تنظيف بيوت بالرياض
Hi there, just a question regarding this skirt. I was looking to make one similar, however I wanted the front to be shorter than the back, and for the back to flow down. I am also planning on using lightly woven polyster. Any help that you can provide would be greatly greatly appreciated ! X
ReplyDelete